

Few things ruin a gaming session faster than looking away for a second, only to watch your character walk right off a cliff. If your Nintendo Switch analog sticks have a mind of their own, you are dealing with the dreaded stick drift. It is incredibly frustrating, but you do not have to immediately go out and spend $80 on a brand-new pair of controllers.
This Switch Joy-Con Drift Fix: Complete DIY Guide will take you through every viable repair method available. We will start with the easiest, zero-risk software tweaks and work our way up to physical, permanent hardware solutions. Whether you are afraid to open up your electronics or you are ready to do surgery with a soldering iron, there is a fix here for you.
Why Joy-Con Drift Happens
To fix a problem permanently, you need to understand why it occurs in the first place. Inside every standard Nintendo Switch Joy-Con is a small analog stick mechanism that relies on physical contact.
[ Your Thumbstick ]
|
[ Metal Wiper Brushes ] —> Slides across
|
[ Carbon Contact Pads ] —> Wears down over time & creates debris
When you move the stick, tiny metal wiper brushes slide across carbon contact pads to translate your physical movement into electrical signals. Over months of heavy gaming, these metal brushes scrape against the carbon. This creates two distinct problems:
- Debris Accumulation: The scraping creates microscopic carbon dust that gets trapped inside the housing, confusing the electrical sensors.
- Physical Wear: The metal springs lose their tension, meaning the stick no longer snaps back to the exact dead center when you let go.
Switch Joy-Con Drift Fix: Complete DIY Guide Overview
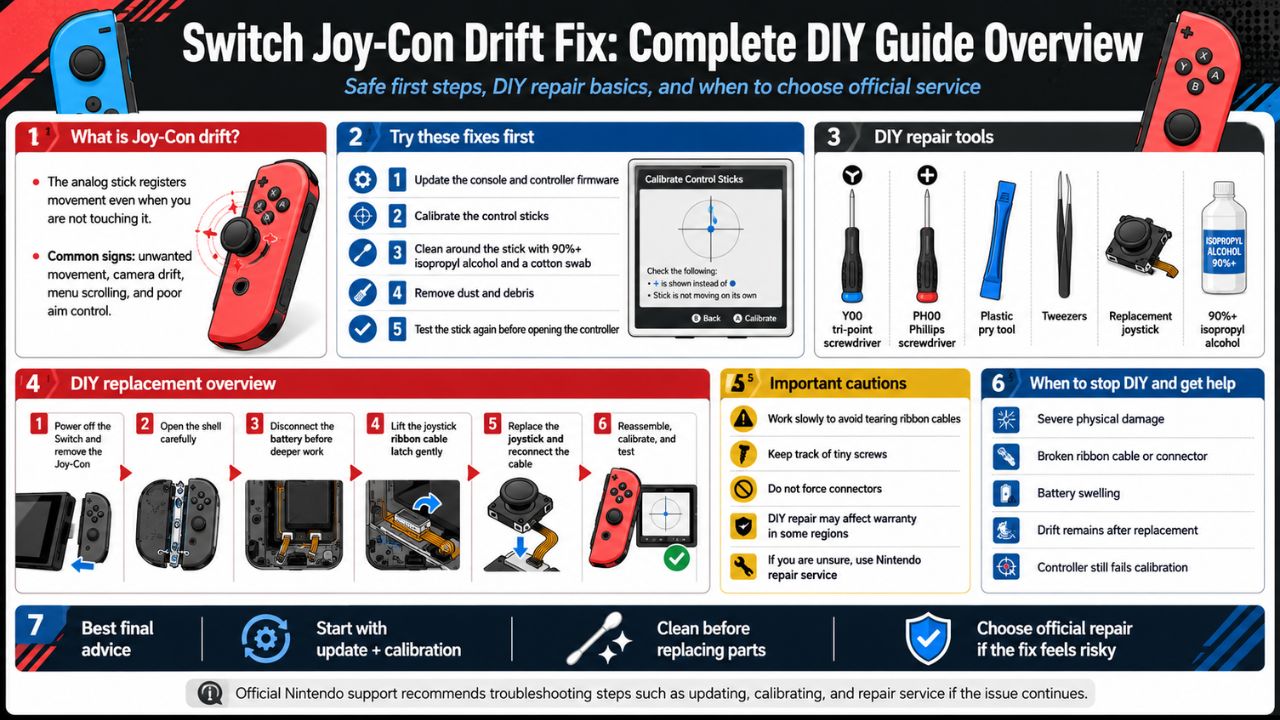
Before diving into the detailed step-by-step instructions, use this overview table to find the fix that matches your comfort level and tool availability.
| Fix Method | Difficulty Level | Risk Factor | Time Required | Key Materials Needed |
| 1. Software Recalibration | Beginner | None | 2 mins | Switch Console Settings |
| 2. Compressed Air Clean | Beginner | Very Low | 5 mins | Can of Compressed Air |
| 3. Contact Cleaner Flush | Intermediate | Low | 10 mins | Electrical Contact Cleaner |
| 4. The Cardboard Shim Method | Intermediate | Medium | 20 mins | Tri-wing Screwdriver, 1mm Cardboard |
| 5. Joystick Replacement | Advanced | High | 45 mins | Replacement Joystick Kit, Tweezers |
| 6. Hall Effect Stick Upgrade | Expert | High | 60 mins | Hall Effect Joystick Kit, Full Toolkit |
6 Ways to Fix Your Joy-Con Drift
Method #1: Software Recalibration
Before buying tools or spraying liquids, check if your system just needs a digital realignment. Sometimes the console’s internal software simply misinterprets the neutral position of your joystick.
System Settings -> Controllers and Sensors -> Calibrate Control Sticks
Follow the on-screen prompts to press the stick down and move it in circles. If the dot centers perfectly after calibration, your problem is solved without spending a dime.
| Feature | Details |
| Best Used For | Minor drift, newly updated consoles, testing before hardware fixes. |
| Cost | $0 |
| Success Rate | Low for physical wear, high for minor digital misalignment. |
Method #2: Compressed Air Blast
Dust, pet hair, and skin cells easily slip under the thin rubber skirt at the base of the joystick. A blast of air can dislodge these loose particles without opening the controller.
Lift the tiny rubber flap under the joystick cap using a plastic toothpick. Insert the nozzle of your compressed air can and give it a few quick, short bursts while rotating the stick.
| Feature | Details |
| Best Used For | Light drift caused by environmental dust or crumbs. |
| Warning | Do not shake the can or tilt it upside down, or liquid propellant will spray out. |
| Pro-Tip | Move the joystick in circles while spraying to clear all angles. |
Method #3: Electrical Contact Cleaner Flush
When compressed air fails, quick-drying electrical contact cleaner or 99% Isopropyl Alcohol can dissolve the stubborn oily residue and carbon buildup inside the housing.
Lift Rubber Flap -> Spray Contact Cleaner -> Rotate Stick 30 Seconds -> Let Dry
Lift the rubber skirt, spray a tiny amount of contact cleaner inside, and immediately move the stick in all directions for 30 seconds. Let the controller dry completely for 15 minutes before turning it back on.
| Feature | Details |
| Chemical Safety | Use dedicated electronics cleaner (like WD-40 Specialist Contact Cleaner). Never use standard WD-40. |
| Drying Time | 15 minutes minimum. |
| Efficacy | Highly effective temporary fix; usually lasts a few weeks to months. |
Method #4: The Cardboard Shim Pressure Fix
Popularized by the gaming community, this brilliant fix addresses the structural issue behind drift. Over time, the metal clips holding the joystick assembly together loosen up, causing a lack of internal pressure.
Open the Joy-Con shell using a Y00 Tri-wing screwdriver. Cut a small piece of thin cardboard (like a cereal box or business card) exactly to the size of the metal joystick box ($approx 1\text{cm} \times 1\text{cm}$). Place it directly over the metal backplate of the joystick and screw the outer shell back together. The extra 1mm of thickness forces the internal components back into tight contact.
| Feature | Details |
| Required Tools | Y00 Tri-wing screwdriver, Phillips #00 screwdriver, tweezers, thin cardboard. |
| How It Works | Restores physical contact pressure between the internal wipers and pads. |
| Risk Note | Be extremely careful not to tear the delicate gold ribbon cables when opening the shell. |
Method #5: Standard Mechanical Joystick Replacement
If the carbon pads inside your stick are completely worn away, no amount of cleaning or pressure will help. You need to swap out the old joystick mechanism for a brand-new factory-style replacement.
Open the outer shell, gently lift out the battery, remove the internal mid-frame, and unlock the ribbon cable connectors. Unscrew the two silver screws holding the joystick in place, swap it with a new one, lock the ribbon cables back down, and reassemble. Always recalibrate the new stick in the console settings after putting it back together.
| Feature | Details |
| Component Cost | $10 – $15 for a kit containing two sticks and tools. |
| Difficulty Details | Requires patience and steady hands to handle miniature ribbon cable latches. |
| Lifespan | Will last as long as a standard factory Joy-Con (several hundred hours of play). |
Method #6: The Ultimate Hall Effect Joystick Upgrade
This is the permanent Switch Joy-Con Drift Fix: Complete DIY Guide solution. Hall Effect joysticks do not use physical brushes or carbon pads. Instead, they use magnets and electrical sensors to measure your movements.
[ Hall Effect Mechanism ]
[ Magnet ] <– Moves with stick
|
v (No physical contact = No wear and tear)
[ Sensor ] <– Measures magnetic field changes
Because the parts never touch, these joysticks physically cannot wear down or develop drift. The installation process is identical to Method #5, but you are installing premium magnetic joysticks (like those made by GuliKit or ElecGear) instead of standard cheap replacements.
| Feature | Details |
| Component Cost | $20 – $30 for a pair. |
| Primary Benefit | Immune to drift forever. Better accuracy and smoother physical movement. |
| Calibration Note | Requires a thorough manual calibration in the Switch system settings right after installation. |
Uncommon FAQs
Can I use rubbing alcohol if I don’t have electronic contact cleaner?
Yes, but only if it is 99% Isopropyl Alcohol. Lower percentages (like 70% rubbing alcohol) contain too much water, which can pool inside the controller, cause corrosion, and short out the circuit board.
Will installing a third-party joystick affect my battery life?
Standard replacement joysticks have no impact on battery life. True Hall Effect magnetic joysticks draw a tiny fraction more power to keep the magnetic sensors active, but the difference is virtually unnoticeable during real-world gameplay.
Why did my Joy-Con start drifting immediately after a system update?
Sometimes a software update changes the dead-zone sensitivity parameters of the console. If your controller already had minor, unnoticeable physical wear, a sudden decrease in the software dead-zone size can cause drift to suddenly appear overnight. Try a full system calibration first.
Conclusion
Dealing with controller issues is a rite of passage for modern gamers, but using a proper Switch Joy-Con Drift Fix: Complete DIY Guide ensures you do not throw away good money on replacement controllers. If you are hesitant about opening up your tech, start with software calibration or a quick spray of electrical contact cleaner. For those who want to fix the problem permanently, investing an hour into installing Hall Effect magnetic joysticks will completely rid your system of drift forever.
Take your time, keep track of your tiny screws, and get back to enjoying your games without your camera spinning out of control!


